Notion API로 정적 블로그 시스템 구축하기
Notion API로 정적 블로그 시스템 구축하기
Notion을 CMS(Content Management System)로 활용하여 GitHub Pages에 배포하는 블로그 시스템을 구축하는 방법을 정리합니다.
왜 Notion을 CMS로?
블로그를 운영하려면 콘텐츠 관리 시스템이 필요합니다. 선택지는 다양합니다:
| 방식 | 장점 | 단점 |
|---|---|---|
| 마크다운 파일 직접 관리 | 단순함, Git 버전관리 | 에디터 불편, 이미지 관리 번거로움 |
| Headless CMS (Contentful, Strapi) | 전문적인 CMS 기능 | 설정 복잡, 유료 플랜 필요할 수 있음 |
| Notion | 익숙한 에디터, 무료, 협업 용이 | API 제약, 빌드 타임 의존 |
저는 이미 Notion을 메모와 문서 작성에 사용하고 있었기 때문에, 별도 학습 없이 바로 글을 쓸 수 있다는 점에서 Notion을 선택했습니다.
시스템 아키텍처
전체 흐름
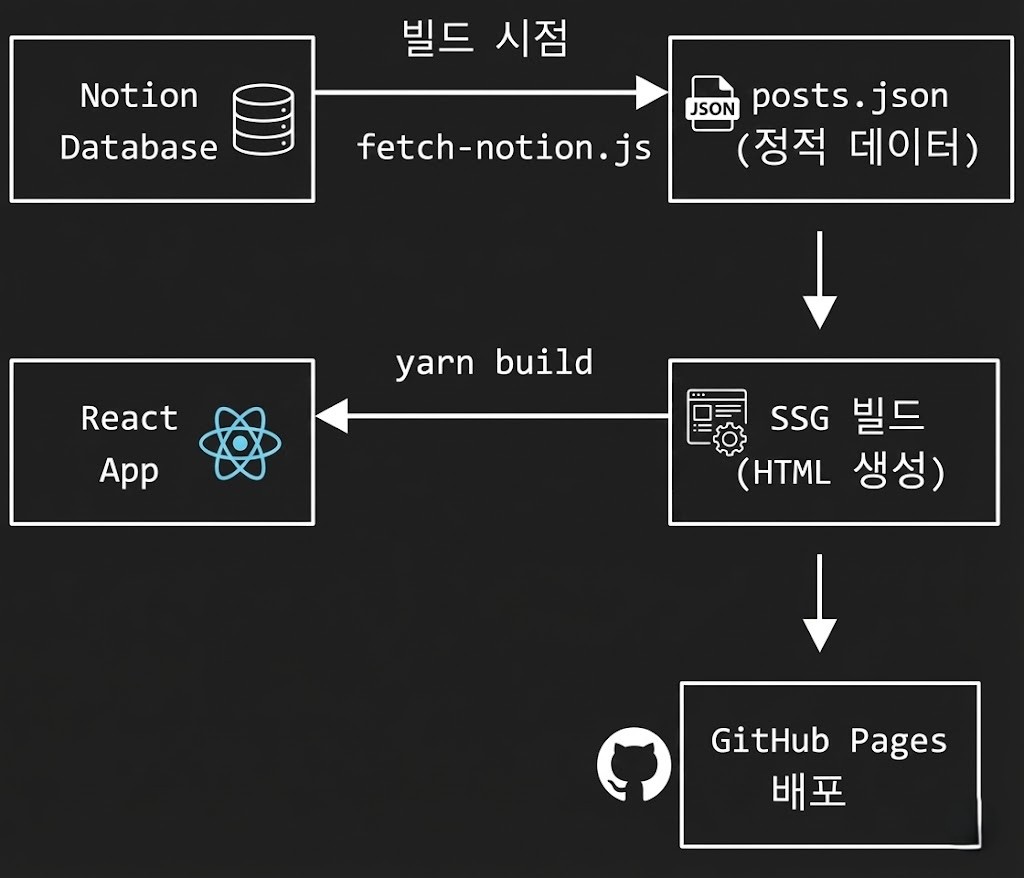 아키텍처 흐름
왜 빌드 타임에 데이터를 가져오나?
GitHub Pages는 정적 호스팅이므로 서버 사이드 로직을 실행할 수 없습니다. 따라서:
- ❌ 런타임에 Notion API 호출 → CORS 에러, API 키 노출
- ✅ 빌드 타임에 데이터를 JSON으로 저장 → 정적 파일로 서빙
Notion 데이터베이스 설정
1. 데이터베이스 생성
Notion에서 새 데이터베이스를 만들고 다음 속성들을 추가합니다:
| 속성명 | 타입 | 용도 |
|---|---|---|
| title | Title | 글 제목 (기본 속성) |
| slug | Text | URL 경로 (예: my-first-post) |
| category | Select | 카테고리 분류 |
| tag | Multi-select | 태그들 |
| series | Select 또는 Text | 시리즈 이름 |
| description | Text | 글 요약 설명 |
| createAt | Date | 작성일 |
| updateAt | Date | 수정일 |
2. Integration 생성 및 연결
- Notion Developers에서 새 Integration 생성
- Internal Integration 선택
- 생성된 API Key 복사
- 데이터베이스 페이지에서 ••• → Add connections → 생성한 Integration 연결
3. 환경 변수 설정
# .env
VITE_NOTION_API_KEY=secret_xxxxxxxxxxxxx
VITE_NOTION_DATABASE_ID=xxxxxxxxxxxxxxxxxxxxxxxxxxxxxxxx
Database ID는 데이터베이스 URL에서 확인할 수 있습니다:
https://notion.so/myworkspace/{DATABASE_ID}?v=...
데이터 가져오기 스크립트
fetch-notion.js 구현
import "dotenv/config";
import { Client } from "@notionhq/client";
import { writeFileSync } from "fs";

const notion = new Client({
  auth: process.env.VITE_NOTION_API_KEY,
});

const databaseId = process.env.VITE_NOTION_DATABASE_ID;

async function fetchBlogPosts() {
  // 1. 데이터베이스에서 모든 페이지 검색
  const allPages = [];
  let cursor;

  do {
    const response = await notion.search({
      filter: { property: "object", value: "page" },
      start_cursor: cursor,
      page_size: 100,
    });
    allPages.push(...response.results);
    cursor = response.has_more ? response.next_cursor : undefined;
  } while (cursor);

  // 2. 해당 데이터베이스에 속한 페이지만 필터링
  const databasePages = allPages.filter((page) => {
    if (page.in_trash || page.archived) return false;
    const parentId = page.parent?.database_id?.replace(/-/g, "");
    return parentId === databaseId.replace(/-/g, "");
  });

  // 3. 각 페이지의 속성과 본문 가져오기
  const posts = await Promise.all(
    databasePages.map(async (page) => {
      const properties = page.properties;
      const content = await getPageContent(page.id);

      return {
        id: page.id,
        title: getTitle(properties),
        slug: properties.slug?.rich_text?.[0]?.plain_text || page.id,
        category: properties.category?.select?.name || "",
        tags: properties.tag?.multi_select?.map((t) => t.name) || [],
        series: properties.series?.select?.name || null,
        description: properties.description?.rich_text?.[0]?.plain_text || null,
        createdAt: properties.createAt?.date?.start || page.created_time,
        updatedAt: properties.updateAt?.date?.start || page.last_edited_time,
        coverImage: page.cover?.external?.url || page.cover?.file?.url || null,
        content,
      };
    })
  );

  // 4. 정렬 후 저장
  posts.sort((a, b) => new Date(b.createdAt) - new Date(a.createdAt));
  writeFileSync("src/data/posts.json", JSON.stringify(posts, null, 2));

  console.log(`Fetched ${posts.length} posts`);
}
블록을 마크다운으로 변환
Notion API는 페이지 본문을 "블록" 단위로 반환합니다. 이를 마크다운으로 변환해야 합니다:
async function getPageContent(pageId) { const blocks = []; let cursor; do { const response = await notion.blocks.children.list({ block_id: pageId, start_cursor: cursor, }); blocks.push(...response.results); cursor = response.has_more ? response.next_cursor : undefined; } while (cursor); return blocks.map(blockToMarkdown).join("\n"); } function blockToMarkdown(block) { const type = block.type; const content = block[type]; switch (type) { case "paragraph": return richTextToMarkdown(content?.rich_text) + "\n"; case "heading_1": return `# ${richTextToMarkdown(content?.rich_text)}\n`; case "heading_2": return `## ${richTextToMarkdown(content?.rich_text)}\n`; case "heading_3": return `### ${richTextToMarkdown(content?.rich_text)}\n`; case "bulleted_list_item": return `- ${richTextToMarkdown(content?.rich_text)}\n`; case "numbered_list_item": return `1. ${richTextToMarkdown(content?.rich_text)}\n`; case "code": return `\`\`\`${content?.language || ""}\n${richTextToMarkdown(content?.rich_text)}\n\`\`\`\n`; case "quote": return `> ${richTextToMarkdown(content?.rich_text)}\n`; case "divider": return "---\n"; case "image": const url = content?.file?.url || content?.external?.url || ""; return `\n`; default: return ""; } } function richTextToMarkdown(richText) { if (!richText) return ""; return richText.map((text) => { let content = text.plain_text || ""; if (text.annotations?.bold) content = `**${content}**`; if (text.annotations?.italic) content = `*${content}*`; if (text.annotations?.code) content = `\`${content}\``; if (text.annotations?.strikethrough) content = `~~${content}~~`; if (text.href) content = `[${content}](${text.href})`; return content; }).join(""); }
이미지 처리 전략
Notion 내부 이미지 URL은 임시 서명이 포함되어 있어 일정 시간 후 만료됩니다. 두 가지 해결책이 있습니다:
방법 1: 이미지 다운로드 (권장)
import crypto from "crypto";
import { writeFileSync, existsSync } from "fs";
import https from "https";

const IMAGE_DIR = "public/images/blog";

async function downloadImage(url, pageId) {
  // URL 해시로 고유 파일명 생성 (서명 부분 제외)
  const urlWithoutQuery = url.split("?")[0];
  const hash = crypto.createHash("md5").update(urlWithoutQuery).digest("hex").slice(0, 8);
  const ext = getExtension(url);
  const filename = `${pageId.slice(0, 8)}-${hash}${ext}`;
  const filepath = `${IMAGE_DIR}/${filename}`;

  // 이미 존재하면 스킵
  if (existsSync(filepath)) {
    return `/images/blog/${filename}`;
  }

  // 다운로드
  return new Promise((resolve, reject) => {
    https.get(url, (response) => {
      const chunks = [];
      response.on("data", (chunk) => chunks.push(chunk));
      response.on("end", () => {
        writeFileSync(filepath, Buffer.concat(chunks));
        resolve(`/images/blog/${filename}`);
      });
    }).on("error", reject);
  });
}
방법 2: 외부 이미지 사용
Notion에서 이미지를 업로드하는 대신 외부 URL(Imgur, Cloudinary 등)을 사용하면 만료 문제가 없습니다.
React에서 데이터 사용
정적 import
SSG 빌드에서 데이터가 포함되려면 JSON을 직접 import해야 합니다:
// src/pages/Blog.tsx
import posts from "@/data/posts.json";
import type { BlogPost } from "@/types";

const Blog = () => {
  const typedPosts = posts as BlogPost[];

  return (
    <div>
      {typedPosts.map((post) => (
        <BlogPostCard key={post.id} post={post} />
      ))}
    </div>
  );
};
타입 정의
// src/types/index.ts
export interface BlogPost {
  id: string;
  title: string;
  slug: string;
  category: string;
  tags: string[];
  series: string | null;
  description: string | null;
  createdAt: string;
  updatedAt: string;
  coverImage: string | null;
  content: string;
}
빌드 파이프라인 구성
package.json 스크립트
{
  "scripts": {
    "fetch:notion": "node scripts/fetch-notion.js",
    "generate:seo": "node scripts/generate-rss.js && node scripts/generate-sitemap.js",
    "prebuild": "yarn fetch:notion && yarn generate:seo",
    "build": "vite-react-ssg build",
    "deploy": "yarn build && gh-pages -d dist"
  }
}
빌드 순서
1. fetch:notion    → Notion API에서 데이터 가져와 posts.json 저장
2. generate:seo    → RSS, Sitemap 생성
3. build           → SSG로 정적 HTML 생성
4. deploy          → GitHub Pages에 배포
고려사항 및 한계
장점
- Notion의 편리한 에디터로 글 작성
- 무료 (Notion 무료 플랜으로 충분)
- Git으로 posts.json 버전 관리
- 빠른 페이지 로드 (정적 파일)
한계
- 글 수정 시 재빌드 필요
- Notion API 호출 제한 (Integration당 초당 3회)
- 복잡한 Notion 블록 (토글, 데이터베이스 뷰 등) 변환 어려움
- 실시간 미리보기 불가
개선 아이디어
- GitHub Actions로 자동 빌드 (Notion Webhook 또는 정기 스케줄)
- 변경된 포스트만 업데이트하는 증분 빌드
- 더 많은 Notion 블록 타입 지원
마무리
Notion을 CMS로 사용하는 블로그 시스템은 개인 블로그나 소규모 프로젝트에 적합합니다. 복잡한 CMS 설정 없이 익숙한 도구로 콘텐츠를 관리할 수 있다는 것이 가장 큰 장점입니다.
다만 실시간 업데이트가 필요하거나 대규모 콘텐츠를 다루는 경우에는 전문 Headless CMS를 고려하는 것이 좋습니다.